A glossy gel manicure should stay flawless for weeks, yet many people notice lifting or peeling after just a few days. The secret isn’t only the gel polish—it’s proper preparation. Following the correct nail prep steps for long-lasting gel ensures smooth, shiny nails that last. At Casa Rio Beauty and Nail Salon in Dubai, we serve clients from Spot City, Motor City, JVT, Arabian Ranches, Arjan, Dubai Hills, and Damac Hills, providing professional gel manicures that truly last.
Book your appointment now and enjoy salon-quality nails that stay perfect for weeks!

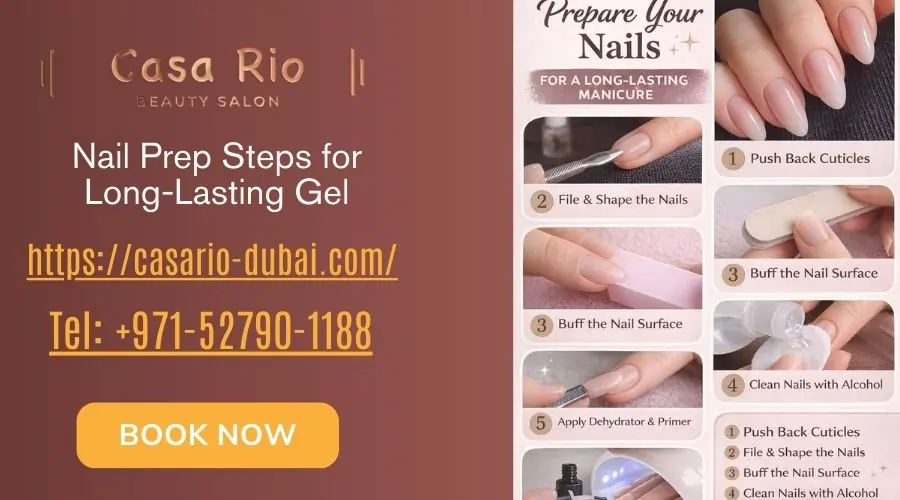
Nail Prep Steps for Long-Lasting Gel Step by Step
Following the correct nail prep steps for long lasting gel step by step is the most important factor in achieving durable gel nails.
Step 1: Remove Old Polish and Clean Nails
Start by removing any existing polish, oils, or product residue from the nail surface. Clean nails allow gel polish to bond properly and reduce the risk of early lifting.
Step 2: Trim and Shape the Nails
Use a nail clipper and file to shape the nails to your preferred style. Proper nail shaping improves the appearance of the manicure and helps prevent breakage.
Step 3: Push Back and Clean the Cuticles
Cuticle care is an important step in nail prep steps for long-lasting gel for beginners. Gently push back the cuticles and remove excess skin from the nail plate. Gel polish applied over cuticles can cause lifting.
Step 4: Buff the Nail Surface
The next stage in step by step gel nails for beginners is lightly buffing the nail plate. Buffing removes the natural shine and creates a slightly rough surface that helps gel polish adhere better.
Step 5: Remove Dust and Oils
After buffing, clean the nail surface using a dust brush or lint-free wipe. This step is essential when performing nail prep steps for long lasting gel at home, as leftover dust can affect gel adhesion. which is one of the main reasons behind why do gel polish peel off.
Step 6: Apply Nail Dehydrator
One of the most important gel nail steps with the dehydrator and primer is applying a nail dehydrator. The dehydrator removes moisture and natural oils from the nail plate to improve bonding.
Step 7: Apply Nail Primer
Primer acts as a bonding layer between the natural nail and gel polish. Skipping primer can lead to lifting or peeling earlier than expected. Learn more about What Causes Nails to Split and Peel to understand how nail health affects gel longevity.
Step 8: Apply Base Coat
Apply a thin base coat and cure it under a UV or LED lamp before applying gel color. This step completes the preparation stage and ensures a smooth foundation for gel polish, especially if you’re going for trendy styles like Milky White Gel Nails.
How to Do Gel Nails Professionally Step by Step
Professional nail technicians follow a precise routine. The how to do gel nails professionally step by step method usually includes:
- Cleaning and shaping the nails
- Preparing the cuticles
- Buffing the nail surface
- Applying dehydrator and primer
- Applying base coat and curing
- Applying gel polish layers
- Sealing with a top coat
This routine ensures glossy, long-lasting results for clients.
Step-by-Step Gel Nails at Home
Many people search for step-by-step gel nails at home to recreate salon-style manicures. To do gel nails at home, you usually need:
- Nail file and buffer
- UV or LED nail lamp
- Gel base coat
- Gel color polish
- Gel top coat
Even at home, following step-by-step gel nails at home instructions and nail prep steps for long-lasting gel for nails ensures better adhesion and longer wear.
How to Do UV Gel Nails with Tips at Home Step by Step
For longer nails, extensions or nail tips are used. The how to do UV gel nails with tips at home step by step process includes:
- Applying nail tips or extensions
- Shaping and blending the tips
- Preparing the nail plate
- Applying builder gel or gel polish
- Curing each layer under a UV lamp
This creates salon-quality results at home. Learn more about What Is Nail Extension Gel.
Steps for Gel Nails with Builder Gel
Steps for gel nails with builder gel include:
- Preparing the nail plate
- Applying dehydrator and primer
- Applying builder gel layers
- Curing under a UV lamp
- Finishing with gel polish or top coat
Builder gel provides stronger nails, making it ideal for long-lasting manicures. For professional options, check Overlay Gel Gelish and Overlay rubber base nails Gelish.
What to Do When Gel Nails Grow Out
As nails grow, gaps appear near the cuticle. Follow what to do when gel nails grow out tips:
- Book a refill appointment (Extensions Refill Service)
- Remove and reapply gel polish
- Change the nail design
- Maintain nails with cuticle oil
Professional salons ensure safe refills while protecting natural nails.
Tips to Make Gel Nails Last Longer
Even when following nail prep steps for long-lasting gel, aftercare is essential:
- Avoid hot water for 24 hours
- Apply cuticle oil daily
- Avoid peeling gel polish
- Wear gloves when cleaning
- Don’t use nails as tools
Proper care can extend manicures up to 3–4 weeks.
Why Choose Casa Rio Nail Salon in JVC Dubai
At Nail Salon in Dubai JVC, our technicians specialize in:
- Professional nail prep techniques
- Premium gel products
- Hygienic tools and sterilization
- Long-lasting gel manicures
- Elegant nail designs and nail art
Whether you prefer classic gel polish, French manicure (Best Gel Polish for French Manicure), or trendy extensions, our experts ensure perfect results using nail prep steps for long-lasting gel step by step.
Book your appointment today at Casa Rio Nail Salon JVC Dubai and enjoy flawless gel nails.
FAQs
How to prep nails to make gel last longer?
To make gel nails last longer, start by removing any old polish and cleaning your nails thoroughly. Push back and trim the cuticles, then lightly buff the nail surface. Apply a nail dehydrator and primer before adding the base coat and gel polish. Following these nail prep steps for long-lasting gel ensures better adhesion and prevents lifting.
In what order do you prep your nails for gel?
The proper order for prepping nails for gel is:
- Remove old polish and clean nails
- Trim and shape the nails
- Push back and clean cuticles
- Buff the nail surface
- Remove dust and oils
- Apply nail dehydrator
- Apply nail primer
- Apply base coat before gel polish
How to prep nails for long lasting nail polish?
For long-lasting nail polish, the key is a clean, dry, and smooth nail surface. Gently push back cuticles, lightly buff nails, remove all dust and oils, and apply a primer or base coat. These steps create a strong foundation that helps your polish last longer without chipping.
How to apply long lasting gel nails?
Apply long-lasting gel nails by following a professional routine: prep your nails properly, apply a base coat, cure under a UV or LED lamp, apply 2–3 thin layers of gel color curing each layer, then seal with a top coat and cure again. Finish by applying cuticle oil for healthy, shiny nails.